

“Component Save System” is a save system for Unity. The plugin was originally made for the RPG Farming Kit, but has been expanded upon to work in multiple projects. The decision to make this plugin free was because there are already a lot of paid alternatives to saving for Unity, such as Easy Save.
I felt that an inclusion of a system would be good for the ecosystem of Unity projects. Making it possible to include a free save tool into sample games or kits. I also felt like Unity lacked an easy way of saving components, akin to the current modularity the engine has.
You can find the plugin on GitHub here. You can also download it through the Unity Asset Store using the link below. Do note that the plugin has become paid since v1.1. The version of Github lacks some features and architectural changes the new version has.
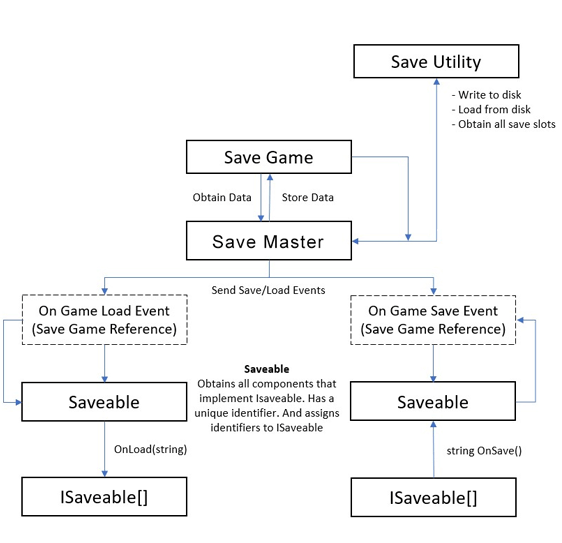
How does it work?
- Once the plugin has been added to your project, a global instance called Save Master will be instantiated before any scene is loaded. This makes it as easy as possible to get started with the plugin, making it plug and play out of the box.
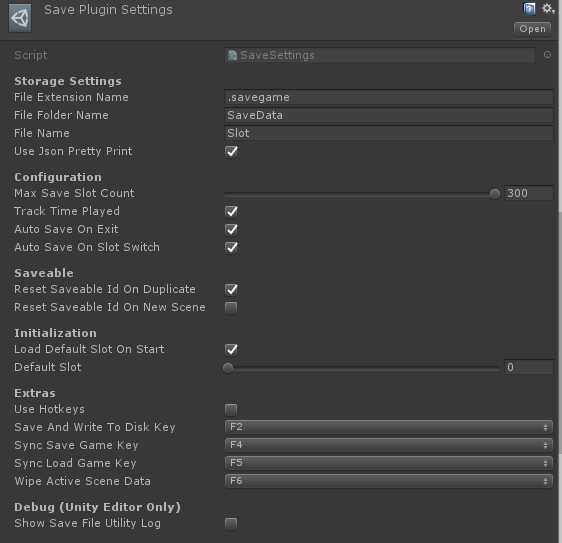
- On startup it tries to load and create a save by default, based on a save slot. This can be turned off in a settings window.
- In order to save and load save games, it uses the Save Utility to get/create the appropriate files.
- Once the Savegame class has been retrieved or created, the save master will inform all currently subscribed Saveable of this reference, as well as all newly spawned objects that contain Saveable components.
- Once a Saveable component is informed (On Load), it will attempt to apply all data from the save game to each component that implements ISaveable. The identification is based on GUIDS. <SceneName><GameObjectName + GUID><ComponentName + GUID>.
- Once a Saveable component gets destroyed it will sent the current state of all the ISaveable components back to the save game.
- Once the Savemaster gets destroyed or the game gets paused (out of focus in Android) the current savegame will get written to the harddisk. You can also call SaveMaster.WriteActiveSaveToDisk() to force this, and you can also disable the auto write of a save in the configuration settings in case you want to have specific save spots in the game.
What does this system add in comparison to other save systems?
Most save systems do not handle the work of giving each object a unique identification. For instance, I want two enemies in my scene with a uniquely saved position, visibility and such. You could store a string like this with a popular saving system:
ASaveSystem.Set<string>("my saved content", "<scenename><objectname><scriptname>")However, once you rename your object or scene name you already run into issues. Also, you would have to rewrite the same implementation in each script, each time to create a proper identification. It could easily turn into a mess, adding more work to turn it into a extendable system. In this case, most of that legwork has already been done for you. Only requiring you to write implementations for your components.
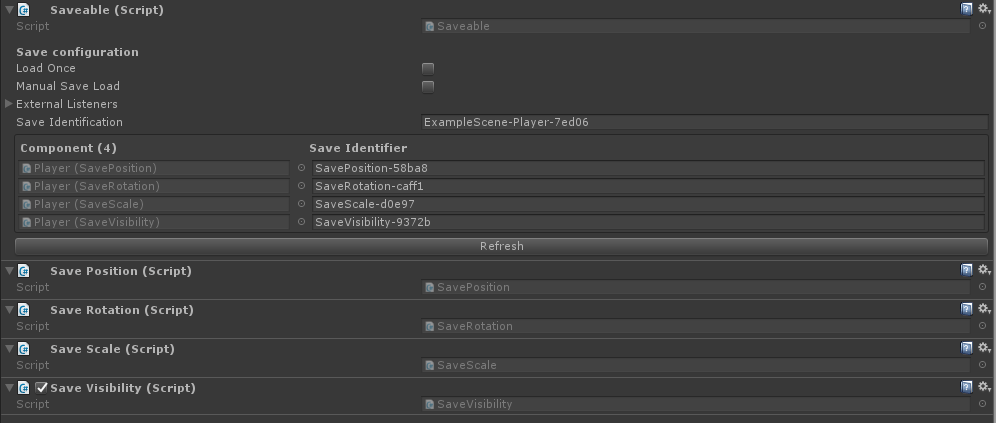
Add a “Saveable” component to an object and let the save system handle the rest for you.
Once you add a Saveable component to the root of a game object, it will fetch all components that implement ISaveable, and serve as a messener and identifier for the object and the components that implement the interface. The saveable is responsible for sending messages to all components that implement ISaveable, for instance once a save or load request has been made. Once a Saveable gets destroyed, the data gets automatically sent to the save game file, meaning that when you switch scenes or exit to the main menu everything is kept saved.
How to create your own saveable components
Creating a saveable component is quite straightforward, atleast if you use a IDE like Microsoft Visual Studio or Rider. Which make it very easy to implement interfaces into existing classes by pressing ALT+Enter.
For your component you have to add this using statement:
using Lowscope.Saving;Afterwards you can add the ISaveable interface to your component. Which adds three methods to your class.
public void OnLoad(string data)
{
    // Data has been given to this component
    // I can now do something with it!
}

public string OnSave()
{
    return "The data that I want to save";
}

public bool OnSaveCondition()
{
    // Should I save, return true or false to potentially improve performance.
    return true;
}
You may be wondering, how can I use a string to send and retrieve data and make it usable for my object? The easiest answer is to use JSON. A text based representation of data. Unity has a built-in tool to turn objects into a JSON string and back into an object. This is called the JSONUtility. Below is an example that uses this utility. This same example is also shown on the github repository.
using Lowscope.Saving;
using UnityEngine;

public class TestScript : MonoBehaviour, ISaveable
{
    [System.Serializable]
    public class Stats
    {
        public string Name = "Test Name";
        public int Experience = 100;
        public int Health = 50;
    }

    [SerializeField]
    private Stats stats;

    // Gets synced from the SaveMaster
    public void OnLoad(string data)
    {
        stats = JsonUtility.FromJson<Stats>(data);
    }

    // Send data to the Saveable component, then into the SaveGame (On request of the save master)
    // On autosave or when SaveMaster.WriteActiveSaveToDisk() is called
    public string OnSave()
    {
        return JsonUtility.ToJson(stats);
    }

    // In case we don't want to do the save process.
    // We can decide within the script if it is dirty or not, for performance.
    public bool OnSaveCondition()
    {
        return true;
    }
}
The representation of this data will look like this once saved:
Ô�{
    "metaData": {
        "gameVersion": 0,
        "creationDate": "11/26/2019 2:47:31 PM",
        "timePlayed": "00:00:20"
    },
    "saveData": [
        {
            "guid": "TestScene-TestScriptGameobject-d4dbf-TestScript-ac11c",
            "data": "{\"Name\":\"Test Name\",\"Experience\":100,\"Health\":50}"
        }
    ]
}
Storing spawned objects. For instance pickups that you drop/pickup
Within the SaveMaster class there is a method called SpawnSavedPrefab(InstanceSource source, string filePath)
Currently there is only support of the Resources folder as a source. How it works is, each scene has a Instance Manager, which keeps track of what has been spawned, and the save identification it contained. Using the given path it will spawn it again using the tracked data.
I have a problem. Everything fine with “SaveVisibility” script, when object was enabled in the beginning. But when object disabled on start it not saved at all, no matter if it was enabled later. Save System just can’t see them. I don’t know how to fix it, I’m afraid to broke something.
Hello id0, for scripts to work in Unity the object needs to be active. Else no code can run on the game object.
This means it wont be possible to load data for objects while they haven’t been activated yet.
Could you tell me what it is that you want to achieve? I’ll probably be able to help you out. You can send me an email to info@low-scope.com
Ok I just change visibilitySaver like that. This seems to work. Maybe this will help someone else:
public bool hideOnStart = true;
bool isLoaded = false;
private bool isEnabled;
private bool firstTime = true;
private void OnEnable(){
if(!isLoaded){
if(hideOnStart){
if(firstTime){
gameObject.SetActive(false);
isEnabled = false;
firstTime = false;
}
}
else
isEnabled = true;
}
else
isEnabled = true;
}
public void OnLoad(string data){
isEnabled = (data == “1”);
gameObject.SetActive(isEnabled);
isLoaded = true;
}
Well, maybe some tweak in the script that checks if the object should be disabled after adding it to the save system? I have some level objects enabling by trigger, and they should remain the same after saving / loading. Yeah, and thanks for great save system 🙂
Hey, could you create a component or show me some code on how to do manuall saving?
I managed to do some kind of manual saving but it would still auto save becouse I hade to untoggle manual saving.
Thanks
Hi! Thanks for your interest in the Component Save System.
Regarding your question, you can toggle off auto saving by going to “Saving/Open Save Settings” in Unity.
You then untoggle “Auto Save On Exit” and “Auto Save On Slot Switch”. Afterwards, you can call this static method in your code to save
the game to disk: “SaveMaster.WriteActiveSaveToDisk();” Hope this helps!. If you have further questions. Feel free to email me at
info@low-scope.com
How do I save transform data? I’m trying to save spawned prefabs as children of a gameobject and when I restart the game, they don’t remain as child objects and instead are spawned directly into the game world.
Hello Josh,
It’s difficult to save to what transform an object has been attached to.
The instance saving system also hasn’t been designed for that. Mainly because there isn’t any way to get a “Key”
that is always the same for a transform, you could do it by using GameObject.Find() but that is also not very robust/performant.
I will add a new event called onSpawnedSavedInstance in the next update. This is a delegate that sends a scene struct and InstanceID.
This way you can at least fetch potential instances when they are spawned.
Hi there thanks for your awesome asset it made my life a lot easier
i want to add a manual save and load button to the UI but i haven’t had any luck yet if it’s not too much trouble would you mind helping me implement this ? thanks in advance
Well, I’m may start to cry after I send this comment.
Thank you so much for your work, all these years I left games made with unity, unfinished and unpublished, because I couldn’t design them to save the data only as int strings etc…
[I don’t know how this works but using my monkey brain, unity has a load scene functionality so…
Spawn game objects on the scene and record them when instantiation happens, then save the position, rot, references parent-child,script, etc..]
Anyway! I Love your work and thank you so much!!!!
Good evening, during a change of scene and a return to the original scene, the reference of recorded components lost their reference, how to do? Thanking you.
I’m assuming this happens because you have things that are dynamically created correct?
You can go around this by saving the state within the spawner of such objects, so that it remembers what to spawn and how
it is connected. Or you can use SaveMaster.SpawnSavedPrefab() if you want to have prefabs keep the state.
Firstly..Awesome asset
I have a chest open animation, how do I save the completed animation? When I re-enter the scene the chest is closed again
Thanks
Hello Col,
I assume you have a open and closed animation, correct?
If you open the animator, do you have a open and closed state?
What you want to do, is save the state of the chest, and apply that upon load.
So you would use this as save data:
[System.Serializeable]
private class SaveData
{
public bool opened;
{
You then send back this data using the OnSave() interface callback,
and during the onload you look if this is set to true. If it is true, you set your local variable to opened (if necessary).
And set the animation to the open state using Animator.Play()
https://docs.unity3d.com/ScriptReference/Animator.Play.html
Thanks for the quick response. This asset is so much better than the paid ones I have!
This is an AMAZING Asset that helps me to save a lot of time and is even free to use.
The background of my project is that I have a login system that users have to sign up from which directs them to the scene. If they leave the scene at any given time their location are supposed to be recorded and saved alongside their login information so that in the future, that individual is able to revisit their progress. To put it simply, I am trying to achieve something like the game Minecraft where each different user have differing spawn locations after they log in where their positions are based on their previous activity. The problem that I am facing is that I am unable to successfully save the different variables of the user inside their own user information.
I took a reference from this video for the login system.
https://www.youtube.com/watch?v=Te5Qx-JAiOs&t
It would be a great help if you guys can help me out on the problem.
Thanks in advance and keep up the great work!
I was just wondering how to manually load data instead of auto loading data. I cant figure out how (am tired so may have missed it). Great Asset!
Hey Alex, thank you so much for this. I started my game with your script and even after many versions, your asset is still working perfectly. There’s just one place where I am stuck. Currently to spawn any prefab it needs to be in resource folder right? How do I change it into my own custom folder?
Thank you in advance.
Hello Sharu, a new version of the Component Save System is getting launched soon. binding.
Make sure to get it from the Asset Store, because the new version will become a paid version. (Existing users get it free)
The new version will allow you to add a new resource loader by providing a Func
This new version should be dropping in the upcoming weeks.
 SaveMaster.AddPrefabResourceLocation("ExampleCustomResourceLoader", (id) =>
 {
 GameObject getResource = ObtainMyResourceMethodHere(id);
return getResource;
});
And calling it like this:
var spawnBomb = SaveMaster.SpawnSavedPrefab(InstanceSource.Custom, "ExplodingBomb", "ExampleCustomResourceLoader");
I have a problem with saving the prefabs. I get an error “object reference not set to an instance of an object” when i am trying to pick up the object.
Hello Maarten,
Could you reply me with a more specific error log?
You can send me a mail at info@low-scope.com
is it possible to instanciate a gameobject under a certain parent when loading
Currently this is only possible by listening to this event:Sorry, this isn’t possible yet with the current version. The next update will make this a bit easier.
SaveMaster.OnSpawnedSavedInstance
The reason for this is, there isn’t an easy way to save what an object was previously parented to.
Unless there is code in place for the saveable to know what to parent to. Using the SaveMaster.OnSpawnedSavedInstance
event you can monitor for spawn events and use savedInstance.transform.SetParent(myParent) to set the parent after spawning.
Example of how you can implement the event:
 private void Awake()
 {
 SaveMaster.OnSpawnedSavedInstance += SpawnedInstance;
 }
private void OnDestroy()
{
// Never forget to unsubscribe
SaveMaster.OnSpawnedSavedInstance -= SpawnedInstance;
}
private void SpawnedInstance(Scene scene, SavedInstance savedInstance)
{
// Check if spawned instance is actually being spawned in the same
// Scene as parent, you can remove this if you like.
if (scene == this.gameObject.scene)
{
// Set the parent to this transform, could also be done for something else.
savedInstance.transform.SetParent(this.transform);
}
}
Really awesome asset. Thank you so much for providing this. I got a couple questions if you don’t mind. How do you stop it from auto loading? the function “Load default slot on start” doesn’t seem to be working for me. If I have an inventory system based on scriptable objects, can this save it? Or a set of bools that keep track of which dialogue has been completed? As you can probably tell, I’m trying to use it for a 3d adventure game (same mechanics as a point and click but 3d). Thanks again for your help and for the great asset.
That’s a bit odd, if you turn off the Load Default Slot On Start it shouldn’t load anything.
Unless you set SaveMaster.SetSlot() somewhere in code. I recommend you to watch the Youtube video to get an idea of how to
save individual components. It should help you enough to move forward. If you got further questions, please send me an email to info@low-scope.com
Hello, This asset is awesome.
But I have problem
When I take a pick up, then reload the scene I want to check if the pick up has been taken or not ?
please help me
There are multiple approaches for this, you could opt for using the SaveVisibility, so it never shows up again.
And having a variable stored in some kind of GameManager. You can check out the YouTube video, in this video I explain how to save
variables. You can also choose to save variables in each pickup and iterate over them / or send it to a singleton.
If you need more help, send me an email to info@low-scope.com
hi, i face a problem while using “Savevisibility” it works fine when the parent object is setActive true but it does not work when i turn off then parent object
Hey Abdul, do you still have issues with the latest version?
Apologies for my late response, please send me an email to info@low-scope.com if you still have issues.
hi! I have a bit of a problem this works great but I don’t think it’s saving through scenes I think it needs to be static ints but that breaks the code
thanks in advance!
Not sure what the exact problem is here?
It should automatically save for each scene you enter/exit.
Maybe you can email me with your exact implementation?